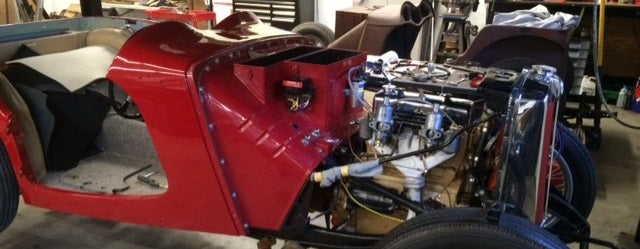
Another TC project!
Some assembly required!
 
|
||
 
|
Project TC number 2! This is another unfinished project, but a bit ahead of the first one! It does come with all new paint on the tub, fenders and bonnet, and it rolls. Engine appears to have been rebuilt, but no documentation found yet, sharp eyes may notice something about the XPAG engine. Hopefully this one will go together as it is, I just hope they fitted most of the parts before painting!
Everyone needs a winter project.....
It certainly was wired.....!
|
|
|||||
|
|
|||||
|
|
 
|


Making more progress on the TC project. Rear fenders and tank on, front fenders, bonnet and headlights too. Lots and lots of fiddly adjustments to get the fenders, front shroud, bonnet sides and top into place. These cars were definitely hand built, and when you buy a car in pieces, you do not know if they are all from the same car! Next up the doors, some rear axle work, and start on the brakes. Brakes appear to be in good shape, except for the original master cylinder which will be replaced. Details, details....

More progress on the red TC. Things moving along, not quite a quickly as we hope. Everyone seems to be hunkered down and working on their own cars, keeping the parts business quite busy! We are getting to the red TC when we can. Doors on, final fitting of fenders and hood, front and rear lights installed and wired. A new brake master cylinder was also done to update the braking system. This went smoothly with the new separable pushrod, see photo.

The rest of this update should be called “the pain in the rear end”, as the rear axle turned out to be a bigger issue than we thought! To backtrack a bit, this car was a long term restoration project by the previous owner, who I think was trying to re-engineer a lot of what he considered weak points of the TC. His intent was to make the car “bullet proof”. The rear axle proved to be another one of those ‘improved’ bits of engineering. Unfortunately, it took us a while to understand what had actually been done to the axle (using the logic, ”who would do that?”). Because one of the hubs was not in the best shape, and actually loose on the splines, we thought we would simply replace the hub and half shaft as a unit, using our TC rear axle and hub assembly. While we were at it, we also decided to fit the modern axle nuts with integral oil seals to prevent oil leakage into the brake drum. Sounds like a couple of hours job, turned into more like a couple of days!
Off came the brake drum, axle nut and out with the old axle and splined hub. A bit of cleanup, and install the modern axle nut with seal. Well not so fast, seems like the axle casing had been rethreaded to a different thread than a standard TC axle casing. What’s up with that….the only nut that would fit on the axle was the one that came off of it. So now we cannot use the modern nuts. Ok, we will just have to fit the new axle and hub using the old nut until we have more time to figure this out, and hope the original oil return bushing was still up to the job. Of course, the new half shaft and splined hub assembly will not go all the way into the casing, it appears to stop about a half inch out, but we can feel that it is engaging the differential splines, so what is the problem? Out comes the new half shaft, and we decide to measure the old and the new, exactly the same length, ok, beginning to think the worst. Then we see what should have been obvious, but of course was not. It originally appeared that the previous owner had installed a sealed bearing in the hub, not that unusual and probably a good idea. However, this bearing was almost twice as wide as the original style bearing, which meant that the splined hub flange was not able to go into the hub as far as it would have with he standard width bearing. See the photos, the end of the axle casing had been cut back (?) to allow for more room for the larger bearing. So with the standard bearing in the hub, the axle nut will not contact the bearing, not looking good. Then we see the issue! In order to make this work, the previous owner had cut about a half inch off the back of the splined hub’s flange, so the half shaft and hub would be able to go all the way in before hitting the larger bearing. That was why the new half shaft and hub would not go all the way in, the correct hub flange was hitting the larger bearing before the axle was seated on the bearing carrier!
re-engineered axle, and original and "improved wide bearing"
 original, correct axle housing end below, notice much shorter cutback behind threads:

New correct splined hub on the left, old hub with rear flange cut off:
You following all this? So we realize that we have a TC with the rear axle casing and diff installed that will not take a standard hub due to the axle end being machined back, won’t take a standard half shaft and hub, or a standard bearing, or a standard or modern axle nut! We can’t really put the old axle half shaft and splined hub back, because the splined hub is loose on the half shaft…..a few hour job turns into a 2 day job, and still can’t put the wheels back on the car. Fortunately, we happen to have a second TC rear axle and diff all set and INSTALLED in our other TC project car. Since the red TC is a lot further along, we have no choice but to remove the rear diff and housing from the other project car and install it in the red TC. Once we realized that was our only option, out with the old, in with the new went fairly quickly. And of course, now we replaced both halfs and splined hubs, new nuts with seals, new mounting hardware, brake hose, project creep for sure. Bleed and adjust the rear brakes, fill the diff, wheels on, jackstands out!
So to recap, the previous owner had machined the axle casing to accept a much larger bearing, machined his own hubs (not cast) to accept the larger bearing, rethreaded the axle ends to a different thread, and cut back the splined hub’s flanges to fit them to this new engineered axle! As I said in the beginning, “who would do that?”. Next up, the windshield.
We thought the windshield angle was not correct and that was most likely the last adjustment we needed to make. Little did we know what awaited us....While the windshield was off, we did a few test drives with the TC. This revealed a few other issues we had not seen. One minor one was the carbs, they had apparently been put together and installed on the car without any adjusting, obviously as the car did not run when we got it. So starting and idling was an issue, but this was quickly resolved with some jet adjustments, final tuning and balancing yet to be done, but is starts and runs good not. Another test ride, another problem. Front brakes got so hot after just a few runs up and down the road that the car could hardly roll into the shop. Pull the front drums, (which were beautifully painted and looked like new by the way) only to find that the front brake shoe on both sides was in backwards! How someone could assemble them this way I do not kknow. By backwards, I mean the spring pins faced the backplate, and the return spring went from outside oon the back shoe, across the hub and UNDER the front shoe to attach to the spring pin on the front shoe. I wwish I had taken a photo of this, I can't imagine how someone would think this was correct, but it was the same on both front wheels. We reinstalled new shoes and springs while we were at it, no more hot brakes. The TC is pretty much done now as far as running and driving, we still need to adjust the windshield angle, fit the rest of the interior and the top, and make a hundred more adjustments, and finish tuning, brake adjustments etc. About 7 months of work, a great deal of it in the last month as we found out the car was going to be featured on Chasing Classic Cars (with a 6 day notice!). A car like this is probably never really finished as most of you know, but it has been a great project, challenging to say the least, but the final result is worth it. You can see more of the finished car in the story about the Chasing Classic Cars filming day.


 original, correct axle housing end below, notice much shorter cutback behind threads:
